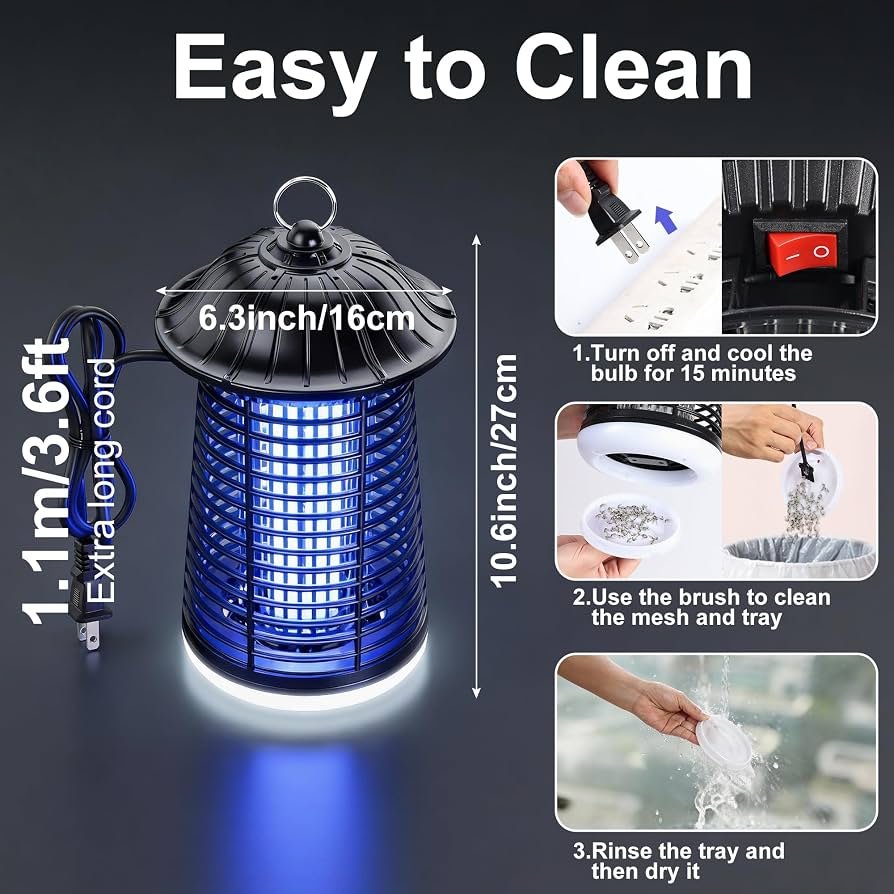
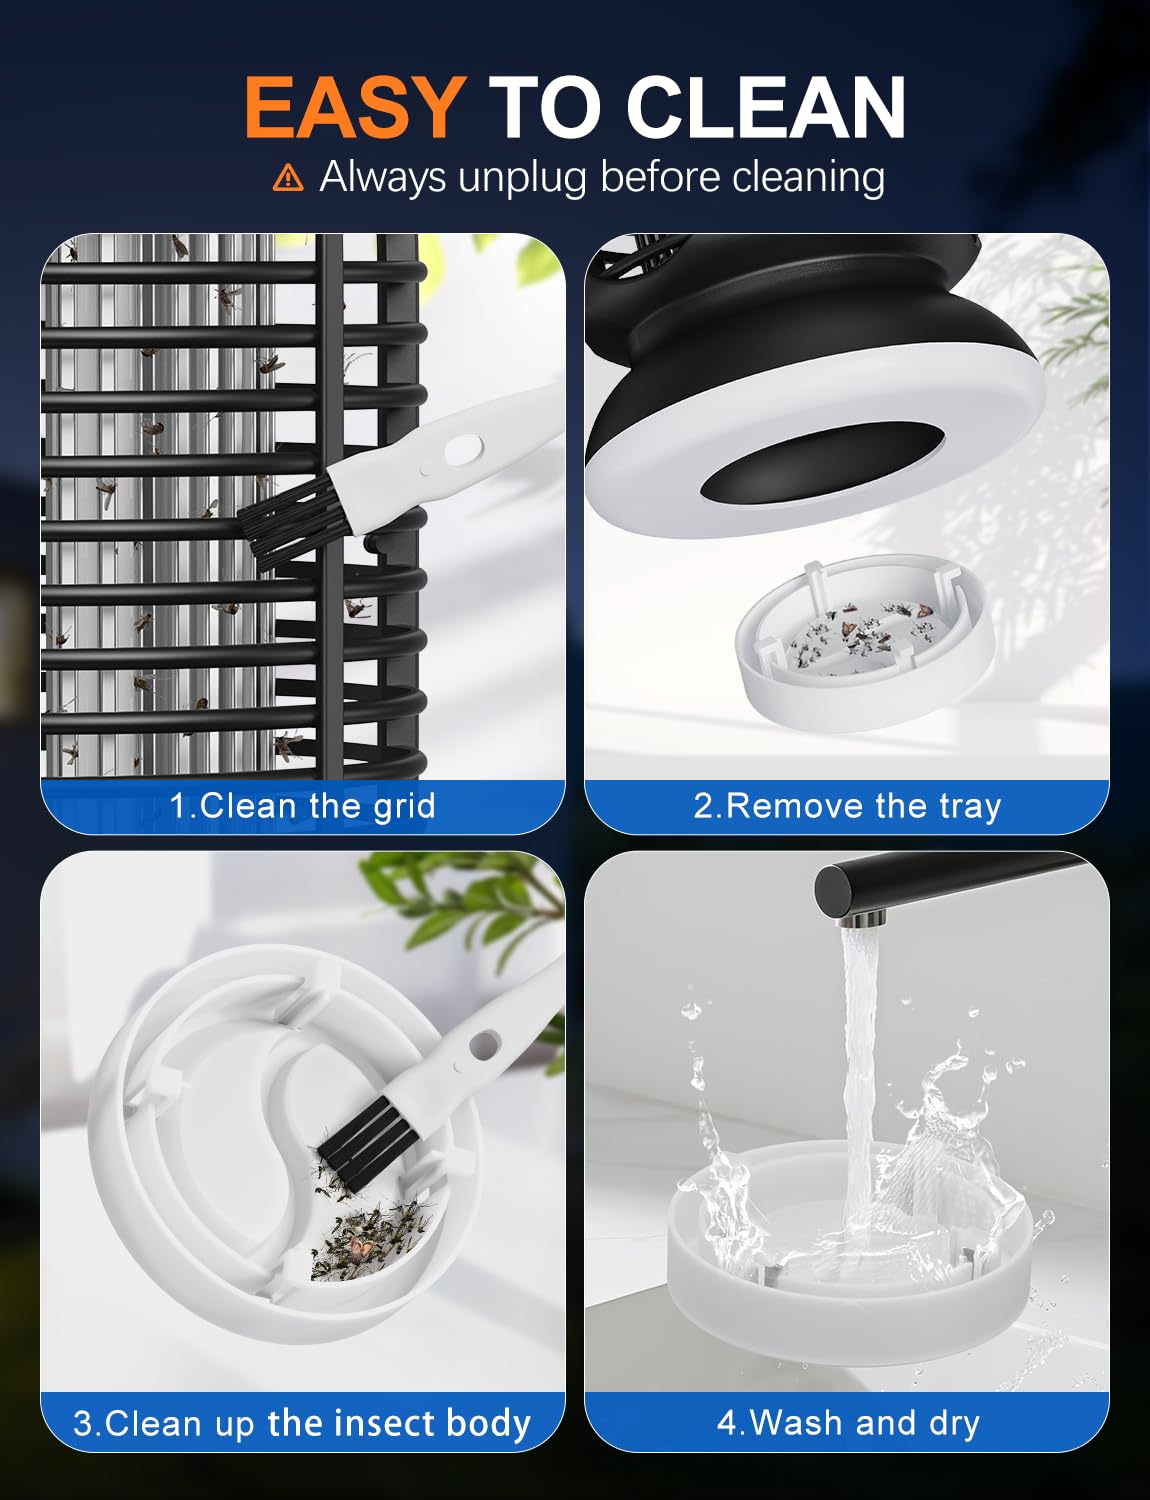
To clean a bug zapper, unplug it, let stored electrical energy dissipate as directed by its manual, remove the collection tray, and gently brush away dead insects with a dry cleaning brush. Never spray water or touch the electric grid while the unit is connected to power.
During warm spring and summer evenings across the United States, bug zappers help homeowners deal with flying insects around patios, porches, garages, and backyards. However, every insect that gets caught in an electric zapper leaves behind small bits of debris. Over time, dead insects, dust, and other particles can collect inside the device and make routine cleaning necessary.
Cleaning a bug zapper is not difficult, but it does require care. Unlike an ordinary outdoor light, an electric insect killer contains a high-voltage grid and electrical parts that can create a shock risk. The safest approach is to disconnect the power first, follow the manufacturer’s waiting period, and use only the cleaning tools approved for your model.
This guide explains how to clean indoor and outdoor bug zappers, empty removable collection trays, remove insect debris from electric grids, and care for UV bulbs and protective housings. It also covers cleaning schedules, common mistakes, and troubleshooting tips so you can maintain your device without damaging its electrical parts.
Source: support.ryobi.co.nz
Why Do You Need to Clean a Bug Zapper?
A bug zapper needs regular cleaning because dead insects and dust can collect around its electrical grid and collection tray. This debris can block parts of the grid, interfere with airflow in some designs, and make routine maintenance harder if you leave it for too long.
When an insect touches an energized grid, the electrical discharge kills it. Small pieces may fall into a removable tray, while other remains can stick to the metal wires or nearby surfaces. This buildup is normal, especially during mosquito season or in places with many flying insects.
Think of a bug zapper like a kitchen filter. It can keep doing its job for a while when dirty, but regular care helps prevent debris from becoming a larger problem. Cleaning also gives you a chance to spot loose parts, damaged wires, and other issues before they become serious.
The amount of maintenance depends on where you use the device. A zapper near a garden, porch light, or outdoor seating area may collect more insects than one in a screened garage. Humidity, dust, pollen, and local insect activity can also affect how quickly the unit becomes dirty.
Source: thegadgetfeed.com
Better grid condition
Removing loose insect remains helps prevent debris from building up around the metal grid.
Cleaner collection tray
Regularly emptying the tray prevents dead insects from piling up inside the bottom of the device.
Easier inspection
Cleaning lets you check the housing, electrical parts, and power connections for visible damage.
Less unpleasant debris
Removing accumulated insect remains helps keep the area around the device cleaner.
What You Need Before Cleaning a Bug Zapper
Gather your cleaning supplies before taking the bug zapper apart. Most basic cleaning jobs need only a few simple items. You do not need strong chemicals, special sprays, or large cleaning tools.
The most important item is a soft, dry brush. Many electric bug zappers include a small cleaning brush designed to reach the grid without damaging its wires. If your model came with one, use that tool instead of a metal brush or another object that could bend the grid.
Wear disposable or reusable gloves when handling the collection tray. Dead insects and dust can spill out when you remove it. A small trash bag or waste container also makes disposal easier.
Keep a dry cloth nearby for the outer housing. Check your manual before using even a slightly damp cloth, since some models do not permit water or liquid cleaners on any part of the unit.
Source: thepesthunter.com
Soft cleaning brush
Use the supplied brush or another suitable dry, soft brush approved by the manufacturer.
Protective gloves
Wear gloves when removing the collection tray or handling insect remains.
Waste container
Use a small trash bag or covered bin to collect dead insects and loose debris.
Dry microfiber cloth
Use it to wipe permitted exterior surfaces without leaving excess moisture.
User manual
Check the manufacturer’s instructions for power isolation, discharge time, removable parts, and cleaning restrictions.
Can You Use a Vacuum Cleaner?
Do not assume that a household vacuum is suitable for cleaning an electric bug zapper. A vacuum nozzle may hit or bend delicate wires, damage a bulb, or reach electrical parts that should not be touched.
Use a vacuum only if the manufacturer specifically allows it and explains which attachment and areas are safe. For most basic cleaning jobs, the supplied dry brush is the simpler option.
How to Clean a Bug Zapper Step by Step
The safest cleaning method starts with disconnecting the power and checking the manufacturer’s instructions. The following steps apply to many common electric bug zappers, but removable parts and cleaning methods can vary by model.
Never begin by reaching through the protective cage or brushing the grid while the device is plugged in. Some units can retain electrical energy after disconnection, so unplugging alone does not always mean that the device is immediately safe to handle internally.
Source: manuals.plus
Step 1: Turn off and disconnect the device
Switch off the bug zapper and unplug its power cord from the electrical outlet. For a cordless model, remove the battery pack as instructed by the manufacturer. Do not pull the plug out by its cord.
Step 2: Allow the electrical charge to dissipate
Follow the exact waiting period in the user manual before cleaning. Different models specify different periods. Some manuals require several hours, while others specify a shorter period. Do not assume that a universal waiting time applies to every zapper.
Step 3: Remove the bug zapper from its hanging position
If the device is hanging outdoors, carefully take it down after disconnecting the power. Use a stable ladder if needed, and avoid pulling on the cord or using the protective cage as a handle.
Step 4: Remove the collection tray
Locate the removable tray at the bottom of the device. Slide it out, twist it, or release its clips according to the manual. Keep it level so dead insects do not spill.
Step 5: Dispose of dead insects
Empty the tray into a waste container or trash bag. Wear gloves and avoid touching insect remains directly. Remove loose debris that has collected around the tray opening.
Step 6: Brush away debris from the grid
Use the supplied dry cleaning brush to gently remove loose insect remains from accessible grid areas. Follow the manufacturer’s directions for brush access and movement. Do not force the brush between wires or bend the metal grid.
Step 7: Clean the outer housing
Use a dry cloth to remove loose dust from approved exterior surfaces. Do not spray the housing or insert liquids into openings. Avoid cleaning internal electrical parts with household chemicals.
Step 8: Inspect the device
Look for damaged wires, cracks, loose fittings, corrosion, damaged insulation, or a broken collection tray. Stop if you find damage that could affect electrical safety.
Step 9: Reinstall the collection tray
Return the clean, dry tray to its original position. Make sure it fits correctly and that all clips, locks, or guides are secure.
Step 10: Reinstall and reconnect the device
Return the bug zapper to its proper location. Check the hanging support and power cord before reconnecting it. Restore power only after all parts are dry, correctly fitted, and free from visible damage.
How Do You Know the Bug Zapper Is Clean?
A clean bug zapper should have an empty collection tray, no loose insect remains in accessible grid areas, and no visible dust buildup around its openings. Its protective housing should also be free from debris that could interfere with normal use.
The metal wires should remain straight and properly positioned. The device should not have loose panels, exposed conductors, damaged insulation, or signs of moisture inside its electrical areas.
Once you restore power, check that the unit operates according to its manual. Do not touch the grid to test it. If the device makes unusual noises, produces an unexpected smell, or behaves differently, disconnect it and investigate through the manufacturer’s support service.
How to Clean the Electric Grid Without Damaging It
The electric grid needs gentle cleaning because its metal wires are part of the device’s high-voltage system. Insects can leave small remains on these wires, and removing loose debris helps keep the grid clear.
First, disconnect the power and wait for the manufacturer’s specified discharge period. Then use the cleaning brush supplied with the unit, following the access method described in the manual.
Brush gently rather than scraping. The metal wires can bend if you push too hard, and a damaged grid may not operate correctly. Never use your fingers, a screwdriver, a knife, or another metal object to remove stuck insect remains.
Some manufacturers allow a small brush or another specific tool for grid maintenance. Others provide a dedicated brush and prohibit alternative tools. The exact manual for your model should determine what you use.
Source: manuals.plus
Use a dry brush
A soft, dry brush helps remove loose insect remains without introducing moisture into electrical parts.
Work gently
Avoid pushing, twisting, or scraping the metal wires.
Keep your hands outside the grid
Never reach into the electrical section, even after switching the device off.
Stop if debris is firmly attached
Do not force stuck material loose. Ask the manufacturer or an authorized service provider about the correct cleaning method.
What If Dead Insects Are Stuck Between the Wires?
If insect remains are stuck between the wires, first check whether your manual explains how to remove them. Use only the approved brush and access points. A gentle movement may remove loose material without disturbing the grid.
If the debris does not come away easily, stop. Do not pull on the wires or take apart the electrical assembly unless the manufacturer specifically identifies that work as a user maintenance task.
A damaged or distorted grid is not a cleaning problem that should be solved by bending the wires back into place. Have the device inspected or replaced as appropriate.
How to Empty and Clean the Bug Collection Tray
The collection tray catches dead insects that fall from the electrical grid. It is often the easiest part of a bug zapper to clean because many models allow the tray to slide out or detach without opening the main electrical assembly.
Disconnect the device before removing the tray, even if the tray appears to be separate from the grid. Follow the manufacturer’s instructions for the required waiting period and removal method.
Wear gloves and empty the contents into a trash bag. If the tray contains a large amount of insect debris, move slowly to avoid spreading dust or remains around your patio, garage, or indoor space.
After emptying it, check the tray for cracks, broken clips, or debris caught in its corners. Clean it only by the method allowed in the manual. Some trays can be washed separately, while others must stay dry because of their design or nearby electrical connections.
If the manufacturer permits washing a detached tray, keep water away from the main unit and allow the tray to dry fully before reinstalling it. Never put a wet tray back into an electrical device.
Source: manuals.plus
Remove the tray carefully
Use the intended slide, twist, or release mechanism rather than pulling hard on the plastic.
Empty it into a trash bag
Dispose of insect remains without spreading them around the cleaning area.
Check for damage
Replace a cracked tray or damaged locking part with an approved replacement.
Dry completely when washing is allowed
Do not reinstall a tray that has moisture on it.
What If Your Bug Zapper Has No Collection Tray?
Some outdoor bug zappers are designed to let dead insects fall through the bottom rather than collect them in a removable tray. These models need attention around the lower opening and the ground beneath the unit.
Disconnect the power and use the approved brush to remove loose remains from accessible areas. Clean the surrounding ground separately, keeping water and cleaning products away from the electrical device.
Do not add a homemade tray or cover an opening unless the manufacturer approves that change. Altering the design can affect airflow, drainage, or the way the unit handles insect remains.
How to Clean Indoor and Outdoor Bug Zappers
Indoor and outdoor bug zappers share the same basic cleaning principle: disconnect the power, follow the required waiting period, and remove debris using approved dry tools. However, their housings, collection trays, and weather protection can differ.
An indoor model may have a removable tray designed for frequent emptying. An outdoor model may have a weather-resistant enclosure, hanging hook, and drainage openings. Neither design should be treated as waterproof unless the manufacturer confirms its rating and permitted cleaning method.
Outdoor devices often collect more dust, pollen, leaves, and insect remains. Indoor models may collect dust and flying insects around kitchens, garages, or other rooms. Clean each device according to its actual use rather than assuming that one schedule fits every home.
Source: ninjachoice.blog
Indoor bug zappers
Pay attention to removable trays, dust around the housing, and the condition of the power cord. Keep cleaning products and water away from the electrical section.
Outdoor bug zappers
Check the protective cage, hanging support, cord routing, and signs of corrosion or weather damage. Disconnect the unit before any maintenance.
Remove the battery pack as directed before cleaning. Keep the battery compartment dry and inspect it for corrosion or damaged contacts.
Portable bug zappers
Check the handle, charging port, protective cover, and removable debris compartment. Follow the specific instructions for rechargeable models.
Can You Wash an Outdoor Bug Zapper With a Garden Hose?
No. Do not assume that an outdoor bug zapper can be washed with a garden hose just because it is designed for outdoor use. Weather resistance does not automatically mean that the unit can withstand direct water spray or pressure washing.
Water can enter electrical openings, damage internal components, or create an electrical hazard. Even rain-resistant models may have strict limits on how and where they can get wet.
Use a dry brush and a cloth on approved exterior surfaces. If your manual allows a specific water-based cleaning method for a removable component, keep that permission limited to the named part.
How Often Should You Clean a Bug Zapper?
Clean your bug zapper whenever you see noticeable insect buildup, and check the collection tray regularly during periods of heavy use. There is no single cleaning schedule that works for every model or location.
A home in a warm, humid region of the United States may have more flying insects during certain months than a home in a cooler or drier area. A zapper near a garden or outdoor light may also collect more insects than one in a covered garage.
Instead of waiting for the device to become heavily clogged, make a quick visual check part of your regular outdoor maintenance routine. Empty the tray when it starts to fill and clean the grid when you see debris collecting on it.
Source: manuals.plus
Light insect activity
Inspect the device periodically and clean it when you see dust or insect remains. Follow the manufacturer’s maintenance schedule.
Moderate insect activity
Check the collection tray weekly during regular use and clean the grid when debris becomes visible.
Heavy insect activity
Inspect the tray and grid every few days, adjusting the schedule based on how quickly debris accumulates.
Seasonal storage
Clean and inspect the unit before storing it at the end of the main insect season.
Signs That Your Bug Zapper Needs Cleaning
The easiest sign is visible insect debris on the grid or inside the collection tray. You may also notice that the lower section is filling up or that dust has collected around the openings.
Unusual buzzing, repeated electrical sounds, or changes in operation should not automatically be blamed on dirt. These symptoms can have other causes, including electrical faults or damaged components. Disconnect the unit if it behaves abnormally.
Visible buildup
Dead insects, dust, and other debris are clearly visible inside the housing.
Full collection tray
The tray contains enough remains to require emptying.
Blocked openings
Loose debris has gathered around the lower opening or protective cage.
Unusual operation
The device makes unexpected noises or shows signs of damage that require inspection rather than routine cleaning alone.
Common Bug Zapper Cleaning Mistakes to Avoid
Many bug zapper problems happen when people clean the device like an ordinary outdoor lamp. An electric insect killer contains electrical components that need a more careful approach.
The biggest mistake is cleaning before disconnecting the power. Another common problem is using too much force on the grid or spraying liquid into the housing. These actions can cause damage or create a safety risk.
Avoid the following mistakes to protect both the device and the person doing the cleaning.
Source: support.ryobi.co.nz
Cleaning while plugged in
Never brush the grid, remove the tray, or perform maintenance while the device is connected to power. Disconnect it first and follow the specified waiting period.
Using water directly on the device
Do not hose down, spray, or immerse the bug zapper. Moisture can damage electrical components and create shock risks.
Using metal cleaning tools
Avoid screwdrivers, knives, steel brushes, and other metal objects that could damage the grid or reach electrical parts.
Scraping the wires
Forceful scraping can bend or break the delicate metal grid. Use the approved brush with gentle movements.
Using household chemicals
Bleach, ammonia, solvents, and strong cleaning sprays can damage plastic, coatings, or electrical components. Do not use them unless the manufacturer specifically permits a particular product.
Reinstalling a wet tray
A removable part that has been washed must be completely dry before it goes back into the unit.
Ignoring damaged wires
A bent, broken, or loose grid needs proper inspection. Do not try to repair energized electrical parts yourself.
Forgetting the power cord
Check the cord and plug for cuts, exposed wires, cracks, or other damage before returning the unit to service.
Why You Should Never Touch the Electric Grid
The electric grid uses high voltage to kill insects. Contact with an energized grid can cause a serious electric shock, so the protective cage must remain in place during normal use.
Turning the switch off may not be enough to make every component safe to touch. Some designs can retain electrical energy after power is disconnected, which is why the manufacturer’s discharge instructions matter.
Never test whether the grid is working by touching it with your hand or an object. If the device needs internal repair, use an authorized service provider.
How to Maintain the UV Bulb and Protective Housing
The UV bulb and protective housing need inspection as part of routine bug zapper maintenance. Cleaning the grid alone does not guarantee that the entire device is in good condition.
Many electric bug zappers use ultraviolet light to attract certain flying insects. The bulb can become less effective as it ages, even if it still appears to glow. A dirty or aging bulb may therefore need attention even when the collection tray is clean.
Before inspecting or replacing a bulb, disconnect the device and follow the manual. Some models require removal of a lower panel or other parts, while others are designed for a simpler bulb replacement. Do not open an electrical assembly unless the instructions identify it as a user-serviceable part.
Source: thepesthunter.com
Check the bulb
Look for visible cracks, discoloration, or signs of damage. Follow the manual for replacement intervals and approved bulb types.
Keep the protective cage intact
Check for loose panels, broken plastic, or bent metal that could expose the grid.
Inspect the hanging support
Make sure hooks, brackets, and other mounting parts are secure before reinstalling an outdoor unit.
Check electrical connections
Look for damaged plugs, worn insulation, and signs of moisture or corrosion. Do not use a damaged device.
Can You Clean a Bug Zapper Bulb?
You can remove loose dust from an accessible bulb only if the manufacturer’s instructions allow it. The device must be disconnected, and the bulb must be handled gently.
Do not spray glass cleaner or another liquid onto the bulb. Avoid pressing against the glass or twisting it while cleaning. If the bulb is cracked or damaged, replace it with the correct compatible part according to the manual.
A bulb that still lights up may not produce the same useful UV output as a new one. Cleaning cannot restore an aging bulb’s original performance, so replacement may be necessary when the manufacturer recommends it.
Bug Zapper Troubleshooting After Cleaning
If your bug zapper does not work properly after cleaning, disconnect it before investigating. Check the simple external causes first, such as an incorrectly installed tray, an unplugged cord, or a battery that was not reinstalled.
Do not open the electrical assembly to investigate a problem unless the manufacturer specifically allows that maintenance. Internal faults should be handled by qualified service personnel.
The following table separates common symptoms from possible causes and safe next steps.
Source: manuals.plus
Common Problems and Their Possible Causes
A cleaning-related problem may come from a part that was not reinstalled correctly. However, unusual sounds, burning smells, visible sparks outside normal operation, or a damaged electrical cord may indicate a more serious fault.
The bug zapper will not turn on
Check whether the outlet has power, the plug is fully inserted, the switch is on, and the battery is correctly installed if the model is cordless. Stop if you find a damaged connection.
The tray will not fit
Check its orientation and the manufacturer’s installation diagram. Do not force it into place or operate the unit with an improperly fitted part.
The grid looks dirty after brushing
Some remains may be difficult to remove. Use only the approved cleaning method and seek manufacturer support if the debris cannot be removed safely.
The device makes unusual sounds
Disconnect it and inspect only accessible exterior parts for visible damage. Do not continue using it if the sound suggests an electrical fault.
The bulb does not light
Check the bulb replacement instructions and approved replacement type. Do not touch or replace internal electrical parts while connected to power.
The device attracts fewer insects
Check for a dirty or aging UV bulb, a blocked grid, incorrect placement, or seasonal changes in insect activity. Cleaning alone may not solve every performance problem.
How to Store a Bug Zapper After Cleaning
Clean your bug zapper before storing it for the off-season. Removing insect remains and dust helps prevent old debris from sitting inside the unit while it is unused.
Disconnect the device, follow the required discharge period, empty the collection tray, and brush away loose debris using the approved tool. Make sure all cleaned parts are completely dry before storage.
Store the unit in a dry indoor location where children and pets cannot reach it. Protect the power cord from sharp edges and avoid placing heavy objects on the device. Keep the original manual and any removable accessories together if possible.
For rechargeable models, follow the manufacturer’s battery storage instructions. Battery care can vary, so do not assume that every model should be stored fully charged or completely empty.
Source: manuals.plus
Clean before storage
Remove dead insects, dust, and other loose debris from approved areas.
Check for damage
Inspect the housing, grid, power cord, and hanging hardware before putting the device away.
Choose a dry location
Keep the device indoors and away from moisture, extreme heat, and direct exposure to damaging conditions.
Protect the power cord
Coil it loosely without sharp bends or tight knots.
Follow battery instructions
Store removable batteries according to the manufacturer’s recommendations.
Should You Clean a Bug Zapper Before Using It Again?
Yes. Before using a stored bug zapper, inspect it for dust, insect remains, corrosion, and damage. Check that the protective cage and collection tray are correctly fitted.
If the unit is dirty, disconnect it and repeat the approved cleaning process. Make sure it is completely dry and in good condition before reconnecting it.
A quick inspection before the first warm evenings of spring can help you find problems before you rely on the device outdoors.
Frequently Asked Questions
Q
Can I clean a bug zapper with water?
Generally, no. Water can damage the electrical components and create a shock hazard. Most manufacturers recommend a dry brush for the electric grid and a dry cloth for approved exterior surfaces.
Some models may allow separate removable parts to be washed. Follow the exact manual and never spray or immerse the main electrical unit.
Q
How long should I wait after unplugging a bug zapper before cleaning it?
The waiting period depends on the model. Some manufacturer manuals specify a few hours for stored electrical energy to dissipate, while other designs specify a shorter period.
Read your specific manual and follow its instructions. Do not assume that switching off the device or waiting a fixed number of minutes makes every model safe to clean.
Q
Can I use a toothbrush to clean a bug zapper?
A clean, soft, completely dry toothbrush may be suitable for some exterior surfaces if the manufacturer permits it. However, the cleaning brush supplied with the bug zapper is usually the better choice for the electrical grid.
Do not force a toothbrush between the wires or use a brush with metal parts. Follow the manufacturer’s approved tool recommendations.
Q
Can I clean a bug zapper without taking it apart?
Yes, many models allow routine cleaning without opening the main electrical housing. You can often remove the collection tray and brush accessible grid areas through the protective openings.
Use only the access points and cleaning tools described in the manual. Do not remove electrical panels or internal components just to reach stubborn debris.
Q
How do I clean a bug zapper that has a lot of dead insects inside?
Disconnect the device, follow the manufacturer’s waiting period, and remove the collection tray according to its instructions. Wear gloves and empty the debris into a trash bag.
Use the approved dry brush to remove loose remains from accessible grid areas. If the buildup is too heavy to remove without force or disassembly, contact the manufacturer or an authorized service provider.
Q
Can I use compressed air to clean an electric bug zapper?
Only use compressed air if the manufacturer specifically allows it and explains how to do so. Air pressure may force debris deeper into the housing, damage delicate parts, or create airborne dust.
For most routine maintenance, a dry cleaning brush is the safer and simpler method.
Q
Why does my bug zapper still look dirty after cleaning?
Some insect remains may stick to the grid or collect in hard-to-reach areas. The cleaning method may also be limited by the design of the protective cage.
Do not scrape the wires or use strong chemicals to remove stubborn material. Check the manual for additional approved cleaning instructions and seek service if the buildup cannot be removed safely.
Q
Does cleaning a bug zapper make it work better?
Removing accumulated insect debris can help keep the grid and collection area clear. This supports routine operation and helps prevent buildup from interfering with the device.
However, cleaning cannot fix every problem. An aging UV bulb, damaged electrical grid, poor placement, or faulty power connection may also affect performance.
Q
Do I need to clean a brand-new bug zapper?
A brand-new bug zapper usually does not need internal cleaning before its first use. Remove packaging materials, inspect the housing and power cord, and follow the setup instructions.
Do not open the electrical assembly or brush the grid unless the manufacturer specifically recommends it.
Q
When should I replace a bug zapper instead of cleaning it?
Consider replacement or professional service if the housing is badly cracked, the electrical grid is damaged, the cord has exposed wires, or the device shows signs of overheating or electrical failure.
Routine cleaning cannot restore broken electrical components. Do not use a damaged unit until it has been properly assessed.
✦ Wrapping Up
Conclusion
Learning how to clean a bug zapper is a simple way to keep up with routine home maintenance. The most important steps are to disconnect the power, follow the correct waiting period, empty the collection tray, and gently remove loose insect remains with an approved dry brush.
Avoid water, strong chemicals, metal tools, and forceful scraping. These cleaning mistakes can damage the electrical grid or create a safety hazard. Always check the manufacturer’s instructions because cleaning methods and waiting periods vary between models.
Regular inspections are especially useful during the warm months when flying insects are active across the United States. A clean collection tray, clear accessible grid, intact housing, and undamaged power cord make it easier to spot maintenance problems early.
💡 Key Takeaway
Before your next cleaning session, find your bug zapper’s user manual, disconnect its power, and check the required discharge time. Then use the approved dry brush to remove loose insect debris, empty the collection tray, inspect the device, and reinstall every part correctly before restoring power.
Is ant killer safe for dogs? Learn which ant killers can harm dogs, how bait and sprays differ, warning signs, safe use tips, and what to do after exposure.